[コラム]App Iconを簡単に作れるTemplateがあった! [iPadアプリ開発]
アプリをリリースする時に一番重要と言っても良い「アイコン」。
iPhone/iPadのホーム画面上でアプリを起動するためにタッチするアプリの顔「アイコン」。
iPhone/iPadのretina対応も含めた色々なサイズのアイコンを基本的に1発で生成してくれる「優れものツール」「App Icon Template」を「appicontemplate.com」が無料で配布しています。
ダウンロードはこちらから。
使い方はPhotoshopを使用した経験のある人ならとても簡単です。
1) PSDファイルをPhotoshopで開きます。
2) ‘EDIT THIS SMART OBJECT'レイヤーを右クリックしてIcon.psbファイルを開きます。
3) Icon.psbファイル上のcanvasで、イラスト作成します。
4) Icon.psbファイルでの作業が完了したら「保存」すると、自動的にApp Icon Template.psdファイル上の画像が描き変わっています。

※スライスも設定されているので書き出しも簡単です。
① [ファイル] メニューから [Web およびデバイス用に保存] を選択します。
② 「マット」を背景色にします。
③ 全てのスライスの書き出しをすると出来上がり!
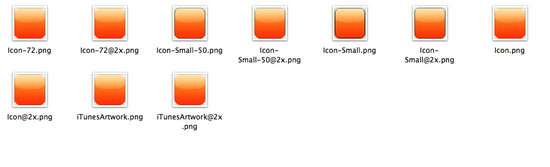
できあがり!
いかがでしたでしょうか。サイズ変更の作業がなくて便利でしょ。
-------------------------
Today, let me introduce the various size App's Icon generator from "appicontemplate.com"
What’s inside?
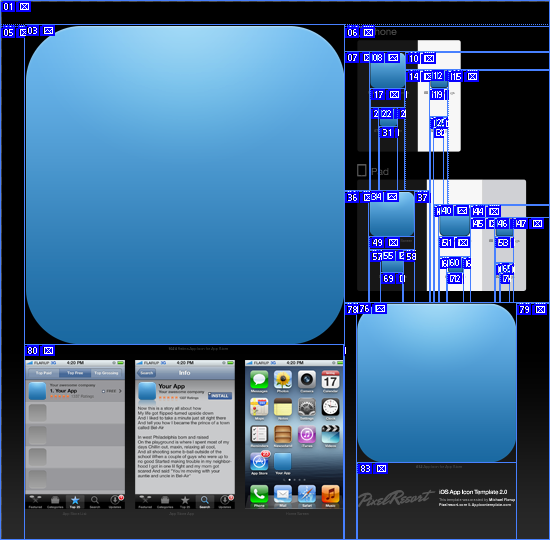
This is an App Icon Template that, through Smart Objects in Photoshop, attempts to automate the process of rendering the various sizes that needs to be bundled with iOS Apps.The idea is to edit the largest size and have the smaller sizes automatically rendered enabling a much quicker workflow when designing icons. You’ll also find a selection of ready-made textures that you can build on and easy export actions that spit out the exact files you need to deliver to Apple.
[How to use]
1) Open the PSD file in Photoshop.
2) Find and right click the layer called ‘EDIT THIS SMART OBJECT' and hit ’Edit Contents’. This opens the Icon.psb file -
3) create your artwork in this canvas.
4) After saving the Icon.psb, the multiple sizes in the Main PSD file should be automatically rendered.
* Use the Photoshop Actions bundled with the resource to export your icon files in both squared and rounded corner versions.
iPhone/iPadのホーム画面上でアプリを起動するためにタッチするアプリの顔「アイコン」。
iPhone/iPadのretina対応も含めた色々なサイズのアイコンを基本的に1発で生成してくれる「優れものツール」「App Icon Template」を「appicontemplate.com」が無料で配布しています。

ダウンロードはこちらから。
使い方はPhotoshopを使用した経験のある人ならとても簡単です。
1) PSDファイルをPhotoshopで開きます。
2) ‘EDIT THIS SMART OBJECT'レイヤーを右クリックしてIcon.psbファイルを開きます。
3) Icon.psbファイル上のcanvasで、イラスト作成します。
4) Icon.psbファイルでの作業が完了したら「保存」すると、自動的にApp Icon Template.psdファイル上の画像が描き変わっています。

※スライスも設定されているので書き出しも簡単です。
① [ファイル] メニューから [Web およびデバイス用に保存] を選択します。
② 「マット」を背景色にします。
③ 全てのスライスの書き出しをすると出来上がり!

できあがり!
いかがでしたでしょうか。サイズ変更の作業がなくて便利でしょ。
-------------------------
Today, let me introduce the various size App's Icon generator from "appicontemplate.com"
What’s inside?
This is an App Icon Template that, through Smart Objects in Photoshop, attempts to automate the process of rendering the various sizes that needs to be bundled with iOS Apps.The idea is to edit the largest size and have the smaller sizes automatically rendered enabling a much quicker workflow when designing icons. You’ll also find a selection of ready-made textures that you can build on and easy export actions that spit out the exact files you need to deliver to Apple.
[How to use]
1) Open the PSD file in Photoshop.
2) Find and right click the layer called ‘EDIT THIS SMART OBJECT' and hit ’Edit Contents’. This opens the Icon.psb file -
3) create your artwork in this canvas.
4) After saving the Icon.psb, the multiple sizes in the Main PSD file should be automatically rendered.
* Use the Photoshop Actions bundled with the resource to export your icon files in both squared and rounded corner versions.
マスターABC!
「マスターABC!」は就学前のお子様が楽しみながら「アルファベット」を学習できるようになっています。あの有名な「ABCソング」から「ゴシック体」「筆記体」まで、正しい筆順で、音声を聞きながら単語とともに習得してしまいます。私の3歳の息子は、すでに「ふくろう=OWL」等とスペルもどんどん覚えていっています。このアプリ、実は海外の売上の方が日本の売上を上回っており、「本場で通用する」英語が習得できます。
iPadでひらがなおぼえちゃう!是非使ってみてね;)
2011年9月に初アプリリリースしました
これからもこどもが楽しんで知性を伸ばしていけるアプリを作り続けたいと思います。応援のほどよろしくお願いします。
目次
aki さん
3歳3か月の息子のママのiPad/iPhoneアプリ開発の奮闘記。
私はJavaとC#などオープン系システム開発を8年ほど国内大手SIerで手がけ、その後4年半ほど某企業のIT部門勤務の経験をしました。子育てを殆ど主人に任せ、家庭と家から遥か離れた職場での仕事をしていることに疑問を抱くようになり2011年6月末に退職。もともと自由な発想でおもしろいとおもうことを試しながらちっちゃな創造を多方面で楽しんでいたのもあって、健康・ダイエットレシピに料理にDIYに凝りながらもスマートフォンアプリを土壌に創造の世界に身を置いています。
[もう少し自己紹介]
ITエンジニアとして生きる道を大学卒業後選択し、オブジェクト指向どっぷりの経験も経由した後、ユーザ企業のIT部門に行くことでユーザの視点も経験したできたことはとても嬉しいことです。ただ、ユーザ企業のIT部門は、一企業のIT課題のの範疇、しかもプロジェクトという限られた枠だけに向き合う仕事であるために、エンジニアスピリット(魂)=新技術の追随と探求のワクワク感を味わうことは、事実上無理です。(それはそれで別のエキサイティングな側面も当然ながらあるのですが。)
その一方で、ユーザ企業ではシステム開発会社では経験できない面白い仕事、海外IT役員との電話会議、や海外出張、海外エンジニアとの共同開発、IT投資意思決定のためのNPVなどの手法を取り込んだ独自ツールの開発などを経験させてもらえたことは恵まれていたと思います。
息子が少しでも日本語に慣れ親しむために、家庭の限られた時間でどこまでできるか分からないけれど、息子や同じように子育てしている人たちが少しでも楽しんで遊んでくれるアプリが作れたら嬉しいな、という思いで備忘録的ですがBlogにしています。 近い将来、エンジニア経験者ママと一緒にいろいろアプリを作っていきたいと思います。

-
nice! 8
記事 56
テーマ パソコン・インターネット
プロフィール
ブログを紹介する
QRコード

日英絵本 みにくいあひるのこ
350円にて発売中。
”子育てママ発”iPhone/iPadユニバーサルの日英バイリンガル絵本をリリースしました。
ハーフの息子が、力強く逞しく生きていってほしいという願いを込め制作しました。


コメント 0